Information Gathering using nslookup


NSLOOKUP: look up and find IP addresses in the DNS Query a DNS domain nameserver to lookup and find IP address information of computers in the internet. Convert a host or domain name into an IP address.
NSLOOKUP is a service to look up information in the DNS (Domain Name System ). The NSLOOKUP utility is a unix tool. Basically, DNS maps domain names to IP addresses.

Any answer that originates from the DNS Server which has the complete zone file information available for the domain is said to be authoritative answer.
In many cases, DNS servers will not have the complete zone file information available for a given domain. Instead, it maintains a cache file which has the results of all queries performed in the past for which it has gotten authoritative response. When a DNS query is given, it searches the cache file, and return the information available as “Non-Authoritative Answer”.

nslookup – Simple Example

    C:\Windows\System32>nslookup www.google.com
    Server:  UnKnown
    Address:  192.168.0.1

    Non-authoritative answer:
    Name:    www.google.com
    Addresses:  2404:6800:4003:803::2004          172.217.27.4


    All other options available for nslookup

    #nslookup 
    Default Server:  UnKnown
    Address:  192.168.0.1
    >help


    Commands:   (identifiers are shown in uppercase, [] means optional)
    NAME            - print info about the host/domain NAME using default server
    NAME1 NAME2     - as above, but use NAME2 as server
    help or ?       - print info on common commands
    set OPTION      - set an option
        all                 - print options, current server and host
        [no]debug           - print debugging information
        [no]d2              - print exhaustive debugging information
        [no]defname         - append domain name to each query
        [no]recurse         - ask for recursive answer to query
        [no]search          - use domain search list
        [no]vc              - always use a virtual circuit
        domain=NAME         - set default domain name to NAME
        srchlist=N1[/N2/.../N6] - set domain to N1 and search list to N1,N2, etc.
        root=NAME           - set root server to NAME
        retry=X             - set number of retries to X
        timeout=X           - set initial time-out interval to X seconds
        type=X              - set query type (ex. A,AAAA,A+AAAA,ANY,CNAME,MX,NS,PTR,
    SOA,SRV)
        querytype=X         - same as type
        class=X             - set query class (ex. IN (Internet), ANY)
        [no]msxfr           - use MS fast zone transfer
        ixfrver=X           - current version to use in IXFR transfer request
    server NAME     - set default server to NAME, using current default server
    lserver NAME    - set default server to NAME, using initial server
    root            - set current default server to the root
    ls [opt] DOMAIN [> FILE] - list addresses in DOMAIN (optional: output to FILE)
        -a          -  list canonical names and aliases
        -d          -  list all records
        -t TYPE     -  list records of the given RFC record type (ex. A,CNAME,MX,NS,
    PTR etc.)
    view FILE           - sort an 'ls' output file and view it with pg
    exit            - exit the program

    a--an IP address
    any--any and all available data
    cname--canonical name
    gid--a group identifier for a group name
    hinfo--CPU and type of operating system
    mb--mailbox domain name
    mg--mail group member
    minfo--mailbox or mail list information
    mr--mail rename domain name
    mx--mail exchanger
    ns--the name servers for the named zone
    ptr--if the query is an IP address, returns a server name; otherwise, a pointer to other information
    soat--he start of authority for the named zone
    txt--returns a textual string with relevant information

    Information Gathering using nmap(network mapper)

    **this tool is very loud to use and can be easily detected

    Nmap ("Network Mapper") is a free and open source (license) utility for network discovery and security auditing. Many systems and network administrators also find it useful for tasks such as network inventory, managing service upgrade schedules, and monitoring host or service uptime.

    Nmap uses raw IP packets in novel ways to determine what hosts are available on the network, what services (application name and version) those hosts are offering, what operating systems (and OS versions) they are running, what type of packet filters/firewalls are in use, and dozens of other characteristics. It was designed to rapidly scan large networks, but works fine against single hosts. Nmap runs on all major computer operating systems, and official binary packages are available for Linux, Windows, and Mac OS X.


    Nmap command usage
    # nmap [Scan Type(s)] [Options] {target specification}


    • Some commonly used commands


    • Scan a System with Hostname

       [root@server1 ~]# nmap www.target.com


    Scan using IP Address
     [root@server1 ~]# nmap 192.168.0.101


    Scan a whole Subnet
    [root@server1 ~]# nmap 192.168.0.1/24


    Scan Multiple Hosts
                             [root@server1 ~]# nmap 192.168.0.101 192.168.0.102 192.168.0.103


    Enable OS Detection
     [root@server1 ~]# nmap -O www.target.com


    Scan OS information and Traceroute
    [root@server1 ~]# nmap -A 192.168.0.101


    Perform a stealthy Scan

    [root@server1 ~]# nmap -sS 192.168.0.101


    Scan Remote host for specific ports with TCP ACK
    [root@server1 ~]# nmap -PA -p 22,80 192.168.0.101

    Mannual for nmap

    TARGET SPECIFICATION:
      Can pass hostnames, IP addresses, networks, etc.
      Ex: scanme.nmap.org, microsoft.com/24, 192.168.0.1; 10.0.0-255.1-254
      -iL <inputfilename>: Input from list of hosts/networks
      -iR <num hosts>: Choose random targets
      --exclude <host1[,host2][,host3],...>: Exclude hosts/networks
      --excludefile <exclude_file>: Exclude list from file
    HOST DISCOVERY:
      -sL: List Scan - simply list targets to scan
      -sn: Ping Scan - disable port scan
      -Pn: Treat all hosts as online -- skip host discovery
      -PS/PA/PU/PY[portlist]: TCP SYN/ACK, UDP or SCTP discovery to given ports
      -PE/PP/PM: ICMP echo, timestamp, and netmask request discovery probes
      -PO[protocol list]: IP Protocol Ping
      -n/-R: Never do DNS resolution/Always resolve [default: sometimes]
      --dns-servers <serv1[,serv2],...>: Specify custom DNS servers
      --system-dns: Use OS's DNS resolver
      --traceroute: Trace hop path to each host
    SCAN TECHNIQUES:
      -sS/sT/sA/sW/sM: TCP SYN/Connect()/ACK/Window/Maimon scans
      -sU: UDP Scan
      -sN/sF/sX: TCP Null, FIN, and Xmas scans
      --scanflags <flags>: Customize TCP scan flags
      -sI <zombie host[:probeport]>: Idle scan
      -sY/sZ: SCTP INIT/COOKIE-ECHO scans
      -sO: IP protocol scan
      -b <FTP relay host>: FTP bounce scan
    PORT SPECIFICATION AND SCAN ORDER:
      -p <port ranges>: Only scan specified ports
        Ex: -p22; -p1-65535; -p U:53,111,137,T:21-25,80,139,8080,S:9
      --exclude-ports <port ranges>: Exclude the specified ports from scanning
      -F: Fast mode - Scan fewer ports than the default scan
      -r: Scan ports consecutively - don't randomize
      --top-ports <number>: Scan <number> most common ports
      --port-ratio <ratio>: Scan ports more common than <ratio>
    SERVICE/VERSION DETECTION:
      -sV: Probe open ports to determine service/version info
      --version-intensity <level>: Set from 0 (light) to 9 (try all probes)
      --version-light: Limit to most likely probes (intensity 2)
      --version-all: Try every single probe (intensity 9)
      --version-trace: Show detailed version scan activity (for debugging)
    SCRIPT SCAN:
      -sC: equivalent to --script=default
      --script=<Lua scripts>: <Lua scripts> is a comma separated list of
               directories, script-files or script-categories
      --script-args=<n1=v1,[n2=v2,...]>: provide arguments to scripts
      --script-args-file=filename: provide NSE script args in a file
      --script-trace: Show all data sent and received
      --script-updatedb: Update the script database.
      --script-help=<Lua scripts>: Show help about scripts.
               <Lua scripts> is a comma-separated list of script-files or
               script-categories.
    OS DETECTION:
      -O: Enable OS detection
      --osscan-limit: Limit OS detection to promising targets
      --osscan-guess: Guess OS more aggressively
    TIMING AND PERFORMANCE:
      Options which take <time> are in seconds, or append 'ms' (milliseconds),
      's' (seconds), 'm' (minutes), or 'h' (hours) to the value (e.g. 30m).
      -T<0-5>: Set timing template (higher is faster)
      --min-hostgroup/max-hostgroup <size>: Parallel host scan group sizes
      --min-parallelism/max-parallelism <numprobes>: Probe parallelization
      --min-rtt-timeout/max-rtt-timeout/initial-rtt-timeout <time>: Specifies
          probe round trip time.
      --max-retries <tries>: Caps number of port scan probe retransmissions.
      --host-timeout <time>: Give up on target after this long
      --scan-delay/--max-scan-delay <time>: Adjust delay between probes
      --min-rate <number>: Send packets no slower than <number> per second
      --max-rate <number>: Send packets no faster than <number> per second
    FIREWALL/IDS EVASION AND SPOOFING:
      -f; --mtu <val>: fragment packets (optionally w/given MTU)
      -D <decoy1,decoy2[,ME],...>: Cloak a scan with decoys
      -S <IP_Address>: Spoof source address
      -e <iface>: Use specified interface
      -g/--source-port <portnum>: Use given port number
      --proxies <url1,[url2],...>: Relay connections through HTTP/SOCKS4 proxies
      --data <hex string>: Append a custom payload to sent packets
      --data-string <string>: Append a custom ASCII string to sent packets
      --data-length <num>: Append random data to sent packets
      --ip-options <options>: Send packets with specified ip options
      --ttl <val>: Set IP time-to-live field
      --spoof-mac <mac address/prefix/vendor name>: Spoof your MAC address
      --badsum: Send packets with a bogus TCP/UDP/SCTP checksum
    OUTPUT:
      -oN/-oX/-oS/-oG <file>: Output scan in normal, XML, s|<rIpt kIddi3,
         and Grepable format, respectively, to the given filename.
      -oA <basename>: Output in the three major formats at once
      -v: Increase verbosity level (use -vv or more for greater effect)
      -d: Increase debugging level (use -dd or more for greater effect)
      --reason: Display the reason a port is in a particular state
      --open: Only show open (or possibly open) ports
      --packet-trace: Show all packets sent and received
      --iflist: Print host interfaces and routes (for debugging)
      --append-output: Append to rather than clobber specified output files
      --resume <filename>: Resume an aborted scan
      --stylesheet <path/URL>: XSL stylesheet to transform XML output to HTML
      --webxml: Reference stylesheet from Nmap.Org for more portable XML
      --no-stylesheet: Prevent associating of XSL stylesheet w/XML output
    MISC:
      -6: Enable IPv6 scanning
      -A: Enable OS detection, version detection, script scanning, and traceroute
      --datadir <dirname>: Specify custom Nmap data file location
      --send-eth/--send-ip: Send using raw ethernet frames or IP packets
      --privileged: Assume that the user is fully privileged
      --unprivileged: Assume the user lacks raw socket privileges
      -V: Print version number
      -h: Print this help summary page.

    How to change imei number of any android within seconds


    Every mobile phone, GSM modem or device with a built-in phone / modem has a unique 15 digit IMEI number. Based on this number, you can check some information about the device, eg brand or model.

    Steps to follow to change your IMEI in second without any application 

    • Type on Dialer *#*#3646633#*#*
    • Select Connectivity and menu will appear, now choose Radio Info and then phone 1
    • Type to the textbox 'AT+EGMR=1,7,"(Your IMEI)"
    • At your SIM select 'Phone 2' → change 1,7 into 1,10 

     (Example: AT+EGMR=1,7,"0123456789101112")
    (Example: AT+EGMR=1,10,"0123456789101112")

    Thats all, your device is configured to your new imei 


    Information Gathering Active VS Passive


    Active Information Gathering involves doing something on a target network/server that could be directly traced back to you.
    For example:
    You run a web app scan, port scan, vuln scan etc. You may enter known bad characters in places of input such as ' < > to produce a crash/error.
    Here you may be breaking the law/Terms of Service of your target network/server. You may show up in a log or security alert somewhere. You may be blocked by Intrusion Prevention Systems (IPS)/Firewalls.


    Passive Information Gathering involves finding information via means that would not be directly tied back to you/your ip address. You might be browsing a site as a typical user. You might find information from whois/robtex/maltego/other public means.

    Information Gathering part3 Using The Harvester tool


    theharvester – A tool for gathering e-mail accounts and subdomain names from public sources.

    Is a really simple tool, but very effective for the early stages of a penetration
    test or just to know the visibility of your company in the Internet.

    The objective of this program is to gather emails, subdomains, hosts, employee names, open ports and banners from different public sources like search engines, PGP key servers and SHODAN computer database.

    Passive:
    --------
    -google: google search engine  - www.google.com

    -googleCSE: google custom search engine

    -google-profiles: google search engine, specific search for Google profiles

    -bing: microsoft search engine  - www.bing.com

    -bingapi: microsoft search engine, through the API (you need to add your Key in
              the discovery/bingsearch.py file)

    -dogpile: Dogpile search engine - www.dogpile.com

    -pgp: pgp key server - mit.edu

    -linkedin: google search engine, specific search for Linkedin users

    -vhost: Bing virtual hosts search

    -twitter: twitter accounts related to an specific domain (uses google search)

    -googleplus: users that works in target company (uses google search)

    -yahoo: Yahoo search engine

    -baidu: Baidu search engine

    -shodan: Shodan Computer search engine, will search for ports and banner of the
             discovered hosts  (http://www.shodanhq.com/)

    Active:
    -------
    -DNS brute force: this plugin will run a dictionary brute force enumeration
    -DNS reverse lookup: reverse lookup of ip´s discovered in order to find hostnames
    -DNS TDL expansion: TLD dictionary brute force enumeration

    Modules that need API keys to work:
    ----------------------------------
    -googleCSE: You need to create a Google Custom Search engine(CSE), and add your
    Google API key and CSE ID in the plugin (discovery/googleCSE.py)
    -shodan: You need to provide your API key in discovery/shodansearch.py

    Simply Download and extract it

    Provide execute permission to: theHarvester.py by [chmod 755 theHavester.py]

    Then simply run  ./theharvester

    How to root any android device without pc


    what is rooting?

    Rooting is the Android equivalent of jailbreaking, a means of unlocking the operating system so you can install unapproved apps, deleted unwanted bloatware, update the OS, replace the firmware, overclock (or underclock) the processor, customize anything and so on.

    How to root a device?

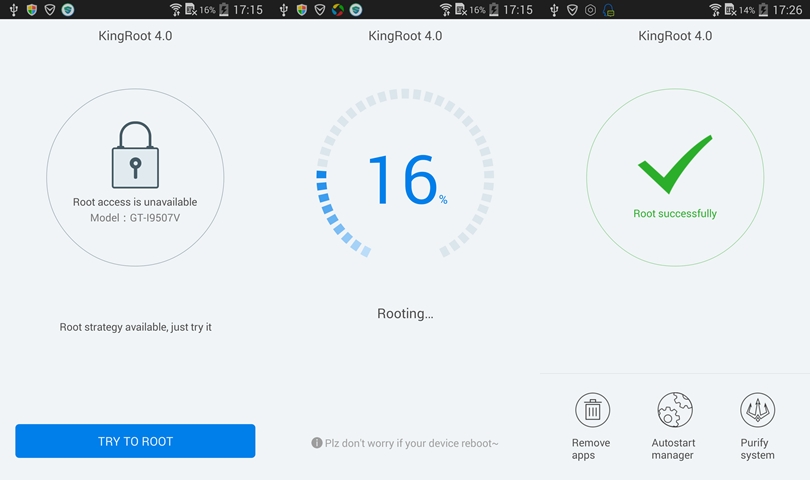
    1. Download kingroot.apk compatible with your device and install it on your device.
    KingRoot
    2. After installing the file open the application and wait till all the modules get loaded.


    3. Now tap on the circle written root on it in the center. Let it now recognize your device and copy files on your system.

    Image result for rooting any device using kingroot
    4. When the process is done you will be able to see king user application on your screen.

    5. Now uninstall the kingroot app and restart your device.

    Thatz it now your device is rooted
    6. Download any root checker application form play store and verify the root.

    Enjoy
    ☺☺☺

    How To Change MAC Address On Kali Linux In Minutes

     A media access control address (MAC address) of a computer is a unique identifier assigned to network interfaces for communications at the data link layer of a network segment. MAC addresses are used as a network address for most IEEE 802 network technologies, including Ethernet and WiFi. Logically, MAC addresses are used in the media access control protocol sublayer of the OSI reference model.MAC addresses are most often assigned by the manufacturer of a network interface controller (NIC) and are stored in its hardware, such as the card's read-only memory or some other firmware mechanism

    1. Open your terminal, and type ifconfig | grep HWaddr
    and you can see your original MAC address.

    2. To change your MAC address, we need to turn off the network interface first by running this command
    ifconfig eth0 down

    3. After that we can configure the new MAC address 
    ifconfig eth0 hw ether 80:f0:0a:74:5b:02.

    4. Now we can turn on the network interface again.  
     ifconfig eth0 up

    5. now you can check the changes by typing the first command.

    How To Patch Any Android Application For Cracking Android Applications


    Lucky Patcher icon


    Lucky Patcher is an app that gives you real control over the permissions you give to the apps installed on your Android. You can delete excessive advertising, change the permissions, create backups of other apps, and much more. That said, you do need a rooted device in order to enjoy these features.

    When you open Lucky Patcher you'll see a comprehensive list of all the apps installed on the device. You just have to tap one of them to see the available options: view the app's information, uninstall it, delete additional data, and access other special tools.

    Among these special tools you can find interesting features that let you, for example, deactivate ads, and even run the app in conditions in which you normally couldn't. You can even create an APK modified according to your preferences.

    Lucky Patcher lets you take control of the apps installed on your Android. As with almost all apps that give more control to the user, a rooted device is required to access all the features.

    How to use lucky patcher
    1. Download lucky patcher.Apk for the link given below and install it on your device.

    2. After installing, open the application and tap on switches button on the bottom of screen and select appropriate settings accordingly.


    3. Now from the main screen select the application you want to patch
    Lucky Patcher screenshot 2
    4. Now tap on the menu of patches icon and u will see various patches available for your application.
    Lucky Patcher screenshot 1
    5. Now select the patch that u prefer (use inapp and LVL emulation for unlimited coins on games etc.) and apply.
    6. Wait for some time and till the patch is applied and it will show u how lucky you are and you are done.
    Thatz it, now open the application and try the applied patch by making purchases. 

    ☺☺☺


    Gns3vault - Study Material For Cisco Ccna Ccnp And Ccie Students


    GNS3Vault is offering you Cisco labs and scenarios that you can download and use with the GNS3 / Dynamips software. My goal is to have a full range of labs to study for CCNA, CCNP and even CCIE. Besides “full” labs there are also plenty of labs focusing on a single technology like Frame-Relay, RIP, OSPF, EIGRP but also BGP, MPLS and many other technologies!
    What am I offering you?
    • Downloadable topologies that you can use right away with the GNS3 software.
    • Different levels of difficulty, there’s something for CCNACCNP and CCIE students.
    • Books that will help you study in case you get stuck.
    • Can’t find what you are looking for? Let me know and I’ll build it.
    • The largest collection of GNS3 Cisco R&S labs on the Internet.
    • And the best thing…all labs are FREE!
    Interested? Take a look at the Labs, read one of my books or join a discussion at the forum. If you have any questions or comments please let me know!
    Good luck, enjoy studying and I welcome you to the world of networking!
    Goto pagehttp://tinyurl.com/zoxbkvv

    Perfect Uninstaller for removing corrupted or half installed programs

    Perfect UnInstaller is a better, easier and faster way for you to completely uninstall any unwanted program that standard Windows Add/Remove Programs can't remove.


    Perfect Uninstaller - A Better and Easier Programs Uninstaller to Uninstall Programs completely
    Have you ever been bothered with software/application/program that are half-installed/uninstalled incorrectly?
    Have you been annoyed with the program you don't want is not in the currently installed programs list so you can not uninstall it through the standard Windows Add/Remove Programs?
    Have you been afraid of the system errorsk or crash as you uninstall a corrupted program manually? If so, you are in the right place here! 

    Perfect Uninstaller - A Better and Easier Programs Uninstaller to Uninstall Programs completely
       Compare With Window Add/Remove Applet
    Perfect Uninstaller Add/Remove Applet
    Forcibly Remove Yes No
    Forcibly Remove Corrupted Program Yes No
    Registry Entries Clean Great Poor
    Forcibly Display/Uninstll Hidden Program Yes No
    Show Details Of Program Great Poor
    Speed Great Poor
     

    Use Keyword Researcher to discover high-value keywords

    Searching for "Long Tail Keywords" just got much easier with "Keyword Researcher Pro!"organize keywords
    Have you ever wondered how to find Long Tail Keywords for your website? When you use Google, you may notice a little drop-down box that represents their attempt to predict what you're about to type next.
    For example when I type the phrase "How does a website..." then Google assumes I might be looking for:
    How does a website make money How does a website work How does a website find my location How does a website server work how does a website help a business
    These are some interesting keywords...
    Wouldn't it be great if there was a way to save all these keywords--so we could add them to our website content?
    Well that is where Keyword Researcher comes in!
    Keyword Researcher is an easy-to-use Keyword Discover Tool. Once activated, it emulates a human using Google Autocomplete, and repeatedly types thousands of queries into Google. Each time a partial phrase is entered, Google tries to predict what it thinks the whole phrase might be. We simply save this prediction. And, as it turns out, when you do this for every letter of the alphabet (A-Z), then you're left with hundreds of great Long Tail keyword phrases.


    How to install a custom rom for any android smartphone


    Android is open source, so developers can take its code, change it and can add features, and build their own operating system images for Android devices.
    A custom ROM replaces your device’s Android operating system stored in read-only memory(ROM) with a new version of the Android operating system.

    How you can install a custom rom for any android phone
    required
    • ROM package
    • custom recovery installed
    • rooted device

    If you dont have a pre-installed cuatom recovery you can install it by following the previous post.
    Now you need to download the custom ROM for your device you an download easily by typing your device name.
    note: You cannot install any ROM on your device

    After downloading place it on your sdcard. Now reboot your device into recovery mode.

    First make a backup of current ROM so that if some problem occurs then you can revert back your device to orignal state.

    After you get a backup, come back to the main menu and select the option to wipe out all partitions and data. If you dont wipe out the data your device may stuck into a bootloop.

    Now Your device is ready for installing a new rom. From the main menu select install from sdcard ad locate your Rom file and let it install.

    After the installation follow the instructions in the screen and BOOM you have a new ROM on your device. 
    enjoy...

    How to install a cuatom recovery on any android smartphone

    First of all why do we need a custom recovery and how it is benificial to us
    All Android devices comes with a recovery tool preinstalled so that at changes could be done with the installed softwares. This recovery software can be used to restore the device to factory settings, update its operating system, wipe out partitions and perform other diagnostic tasks and much more.

    How you can get a custom recovery for your own device??
    required tools
    rooted device
    tool hero.apk download
    recovery image file

    There are several types of recoveries available on the internet for different devices such as CWM recovery or TWRP recovery. You can simply download any recovery image for your device by simply searching the recovery and device name on google.
    After downloading the recovery.img file move it to the sdcard/toolhero/recovery folder.
    Open the tool hero application and choose recovery Option.Now your downloaded image file will appear.
    click on the file and install it and you are done..

    How To See Anyone's Private Photos On Facebook


    See private photos of any facebook users without being friends by installing a simple addon "i can see you" only for chrome users. This is a simple addon extension u can install it by clicking on the ink given below.
    With this extension you can check any private photos of any facebook users without being friend. It does not show you private photos if the profile of the owner made the profile very strict and made all the things private in profile settings. But definitely you will see many profiles private photos with this extension.These photos you can't see directly on facebook.
    This add on is usefull when the user is not in your friend circle.

    How To Send Email From Terminal( method 2)

    This is a new ttorial about how to send E-Mails from terminal.
    For this you have to install an application name “sendemail”
    You can install it by simply typing 

    $ sudo apt-get install sendemail

    For sending the email just follow the syntax given below
    $ sendemail -t (destination address ) –f (from eg. foo@bar.com ) –s (server:port) –xu (smtp server username ) –xp (smtp password) –m (message)
    It will use gmail as smtp server to send mail
    sendemail –-help to see all options , or you can read manual using man sendmail


    How to Share Any Format And Any Size Files On Whatsapp

    Users can share videos, images and audio only. It doesn’t come with any built-in function that can allow users to share Doc, PDF, APK and more.

    The size of any file to be share shouldn’t exceed 16 MB. It means videos over 16 MB cannot be shared. However, Whatsapp comes with functionality to compress or trim video files before you share.  However, it still has limitation. Sending very large videos is not possible.

    Every smartphone comes with a build-in google drive application .
    1. You just have to login into Your google account to have access to the google drive services.

    2. After logging into google drive click on the upload button on the left corner and a popup will appear on the screen asking to select the file to share.

    3. Locate the file and upload it . After the uploading is done select the file for more options.

    4. Select the option of share via link and copy the link generated on the screen and send the link on facebook or whatsapp and the link will redirect you to the file you want to share. 

    How To Send Fake E-Mails Fully Anonymous Through Terminal

    In this method we will use telnet service to send emails.
    *This tutorial is ony for educational purposes.

    Sending email with this tutorial is completely different from sending it through normal gmail or yahoo. Normally gmail and other mail services use encryptions to send mails whereas in telnet mails send are unencrypted.

    1. Open the terminal or command prompt. and run the telnet command to connect to the mail server.telnet mail.domain.com 25  or  telnet 192.168.x.x 25here the service is telnet and is trying to connect to mail server of the domain on port 25.
    if you do not know the mail server adderss you can search it via nslookup and setting type=MX

     2. After get reply message from the mail server, we can start define the email sender and email recipient.MAIL FROM: hacking-tutorial@domain.com

    3. The next step is create the recipient.RCPT TO: me@otherdonain.com

    4. If email sender and email recipient already OK, we can compose our message. Type DATA and press enter.

    5.Then create the subject of our email  by typing SUBJECT: hello

    6. To end the message, put the only dot (.) in a single line and press <enter>, it mean that we already finish composing the message and ready to send it.

    7. To quit the telnet, just type QUIT.